


.jpg)

Teradata - Overview
PowerCenter works with many databases, among which Teradata is one of a kind. Informatica PowerCenter integrates Teradata database into any business system, and it serves as the technology foundation for controlling data movements. In Informatica PowerCenter, ODBC is used to connect with Teradata tables and its data.
This blog helps you to create, configure, compile, and execute a PowerCenter workflow in Windows that can read the data from and write the data to Teradata database.
What’s unique about Teradata database?
Teradata is an RDBMS with multiple processors to cater to parallel processing. Because of its linear scalability, the performance increases as you increase the number of nodes.
Configuring and Executing a PowerCenter Workflow
Let us look at the set of steps for Configuring Teradata ODBC Connection on Powercenter Informatica.
Prerequisites
- Ensure that you have the latest version of VMware Workstation Player
- Install a Teradata Express VM on the VMware player (It’s the Teradata server)
- Download from the below link Teradata Express for VMware Player
- Make sure you have a Teradata Tools and Utility for Windows (TTU)
- Download from the below link Teradata Tools and Utilities - Windows Installation Package (this includes Teradata ODBC driver, SQL Assistant, and Administrator)
- Informatica PowerCenter
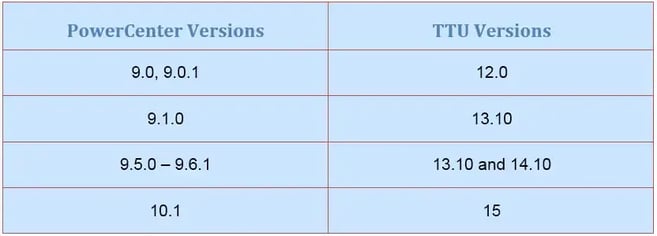
This table lists the TTU versions and the corresponding compatible PowerCenter versions.
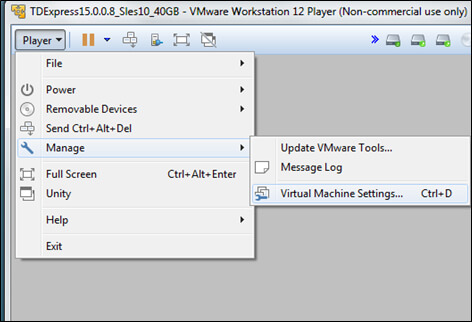
Configuration in Teradata VMware
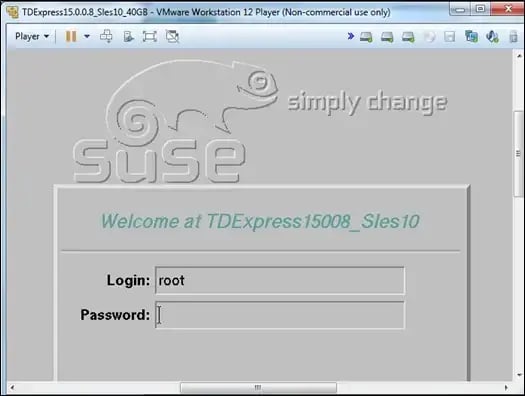
After the installation of Teradata VM, you can power on the virtual machine.
- Login into the VMware by providing the username and Password.
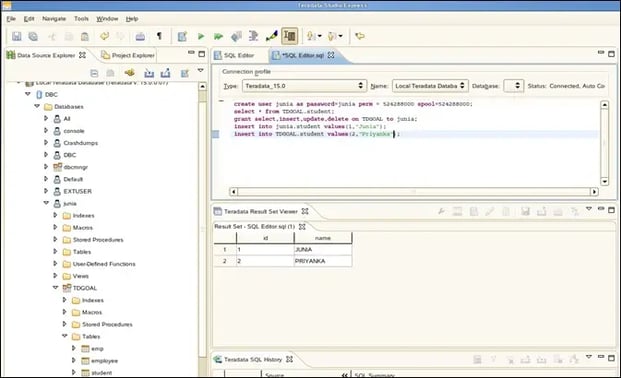
- Login into the Teradata Studio Express, which resides inside the VM.
- Create a new database, user, tables and data of your requirement.
Finally, check whether the Network Adapter setting is set to “Bridged Network” to make Teradata VM to be visible to all the machines in the network.
Configuration In PowerCenter
If the PowerCenter server and client application are on the Windows machine, then you need to perform the below steps in both the server and client.
- Add an entry in the host file for the IP address of the Teradata VM
- After the installation of TTU in Windows,
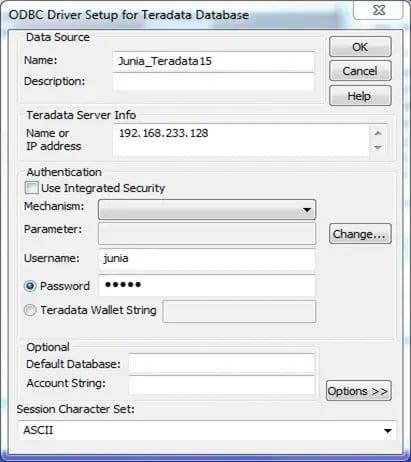
- Create a System DSN in ODBC Administrator with ‘Teradata’ as a driver.
- Give a name for the Data Source.
- Specify the IP or VM name in the ‘Name or IP address’ field.
- Give the username and password of your Teradata database.
Sample Mapping
Create a mapping in the PowerCenter Designer application with your requirements.
Reading Data from Teradata Database
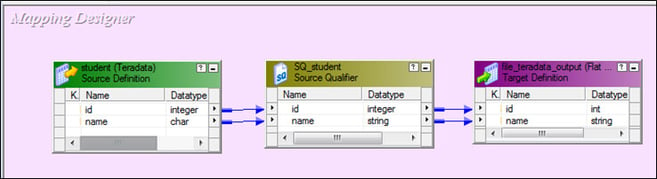
Writing Data to Teradata Database

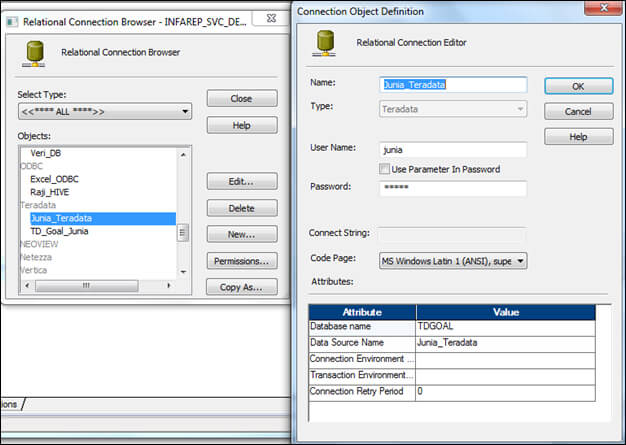
Relational Connection Configuration
Open the Workflow manager and create a new relational connection
- Name the relational connection
- Provide the username and password for the database from which tables are accessed
- Give the name of the database in the Database name attribute and the data source name in the Data source name attribute.
- Connection Environment SQL: Specify the SQL if any, to run every time a connection is made
- Transaction Environment SQL: Specify the SQL, if any, to run at the beginning of each transaction.
Challenges faced
The workflow failed because of the following error:
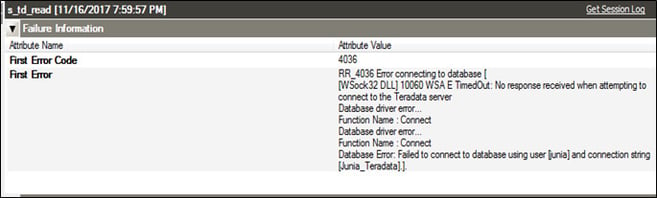
Choosing the appropriate Adapter Settings
This error occurred because the Informatica server couldn’t connect with Teradata VM when “NAT” was the network adapter setting for the VMware. To resolve this, switch the network adapter setting to “Bridged network”
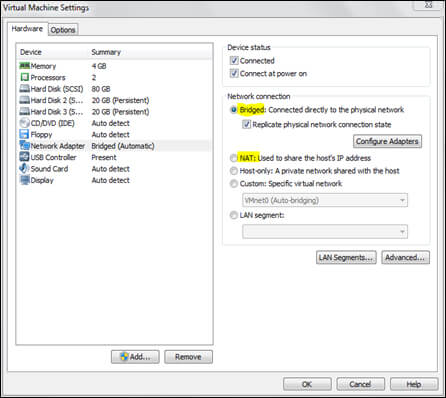
If you use NAT, VM will not have its own IP address on the external network. The host system shares a single network identity, which is not visible on the external network.
Instead, when you use Bridged networking, it connects the VM to a network by using the network adapter on the host system and will have its own IP address.
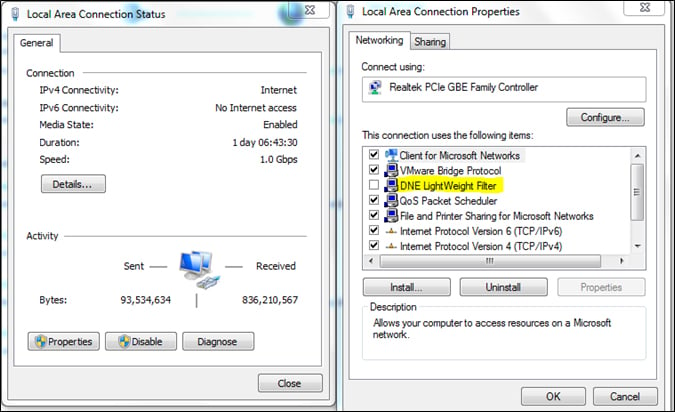
Connecting Host and Guest
The connection between the host and guest VM (Teradata VM) failed while pinging from the command prompt. The connection between the guest and other machines (except the host) on the network was good.
This error was resolved by following the below steps in the host machine
- Open Network and sharing center
- Select your adapter that has Internet
- Click Properties button from the Connection Status Window
- Uncheck DNE Lightweight Filter in the Adapter's properties
- Click OK and wait for your adapter to reset by itself
Conclusion
This completes the execution of a PowerCenter workflow in Windows to read and write the data to Teradata database